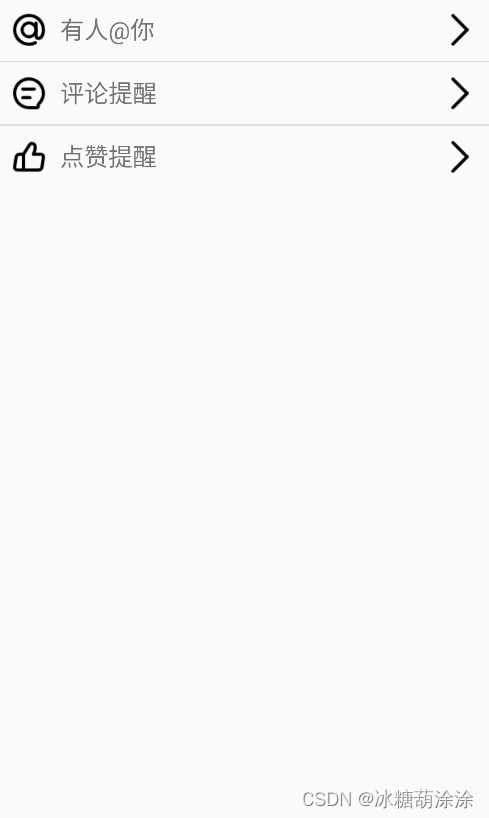
1. 效果预览
2. 在布局文件中放置 ListView 控件
<?xml version="1.0" encoding="utf-8"?> <LinearLayout xmlns:android="http://schemas.android.com/apk/res/android" xmlns:tools="http://schemas.android.com/tools" android:layout_width="match_parent" android:layout_height="match_parent" tools:context=".MainActivity"> <ListView android:id="@+id/listView" android:layout_width="match_parent" android:layout_height="wrap_content"/> </LinearLayout>3. 创建 ListView 的 item 布局
<?xml version="1.0" encoding="utf-8"?> <RelativeLayout xmlns:android="http://schemas.android.com/apk/res/android" xmlns:tools="http://schemas.android.com/tools" android:layout_width="match_parent" android:layout_height="wrap_content"> <ImageView android:id="@+id/iv_interaction" android:layout_alignParentStart="true" android:padding="10dp" android:layout_width="wrap_content" android:layout_height="wrap_content" tools:ignore="ContentDescription" /> <TextView android:id="@+id/tv_interaction" android:layout_toEndOf="@+id/iv_interaction" android:layout_centerVertical="true" android:textSize="20sp" android:layout_width="wrap_content" android:layout_height="wrap_content" tools:ignore="RelativeOverlap" /> <ImageView android:id="@+id/messages_into" android:layout_alignParentEnd="true" android:padding="10dp" android:layout_width="wrap_content" android:layout_height="wrap_content" tools:ignore="ContentDescription" /> </RelativeLayout>4. 创建实体类
public class InteractionBean { private final int iv_interaction; private final String tv_interaction; private final int messages_into; public InteractionBean(int iv_interaction, String tv_interaction, int messages_into){ this.iv_interaction = iv_interaction; this.tv_interaction = tv_interaction; this.messages_into = messages_into; } public int getIv_interaction() { return iv_interaction; } public String getTv_interaction() { return tv_interaction; } public int getMessages_into() { return messages_into; } }5. 创建适配器继承自 BaseAdapter
public class InteractionAdapter extends BaseAdapter { private final Context context; private final List<InteractionBean> interactions; public InteractionAdapter(Context context, List<InteractionBean> interactions){ this.context = context; this.interactions = interactions; } @Override public int getCount() { return interactions.size(); } @Override public Object getItem(int i) { return interactions.get(i); } @Override public long getItemId(int i) { return i; } @Override public View getView(int i, View view, ViewGroup viewGroup) { ViewHolder holder; if (view == null){ view = LayoutInflater.from(context).inflate(R.layout.interaction_item, viewGroup, false); holder = new ViewHolder(); holder.iv_interaction = view.findViewById(R.id.iv_interaction); holder.tv_interaction = view.findViewById(R.id.tv_interaction); holder.messages_into = view.findViewById(R.id.messages_into); view.setTag(holder); }else { holder = (ViewHolder) view.getTag(); } holder.iv_interaction.setImageResource(interactions.get(i).getIv_interaction()); holder.tv_interaction.setText(interactions.get(i).getTv_interaction()); holder.messages_into.setImageResource(interactions.get(i).getMessages_into()); return view; } static class ViewHolder{ ImageView iv_interaction; TextView tv_interaction; ImageView messages_into; } }6. 为 item 设置数据,为 ListView 设置适配器
public class MainActivity extends AppCompatActivity { @Override protected void onCreate(Bundle savedInstanceState) { super.onCreate(savedInstanceState); setContentView(R.layout.activity_main); ListView listView = findViewById(R.id.listView); List<InteractionBean> interactions = new ArrayList<>(); InteractionAdapter adapter = new InteractionAdapter(MainActivity.this, interactions); InteractionBean at = new InteractionBean(R.drawable.messages_at, "有人@你", R.drawable.messages_into); InteractionBean comment = new InteractionBean(R.drawable.messages_comment, "评论提醒", R.drawable.messages_into); InteractionBean like = new InteractionBean(R.drawable.messages_like, "点赞提醒", R.drawable.messages_into); interactions.add(at); interactions.add(comment); interactions.add(like); listView.setAdapter(adapter); } }